Showing posts with label Natural. Show all posts

Monday, December 24, 2012

Homemade Oil Of Oregano


I had gotten introduced to Oil of Oregano a few years ago and have been using it as a go-to method when I feel a cold or flu coming on.
The one thing I wasn't impressed with however, was the price.
Thankfully I found this recipe online and decided to whip myself up a batch!
Here are a few of the benefits of Oil of Oregano:


  • Destroying organisms that contribute to skin infections and digestive problems.
  • Strengthening the immune system.
  • Increasing joint and muscle flexibility.
  • Improving respiratory health.

Skin Infections

Oil of Oregano can be applied directly onto the skin to treat itches, skin infections, and irritated gums, but only if it has been diluted. Always follow the instructions on your particular bottle before applying topically onto the skin, since highly concentrated oils may first need to be mixed with Olive Oil or Coconut Oil before application (usually one teaspoon of Olive Oil or Coconut Oil per one drop of Oil of Oregano). 

Digestive Problems

The high concentrations of thymol and carvacrol in Oil of Oregano have been shown to calm upset stomachs and aid digestion. Therefore, a quick home remedy for mild indigestion is to drink a glass of milk or juice that is mixed with 2 or 3 drops of the oil. 

Sinus Congestion

Oil of Oregano is a wonderful natural remedy for sinus congestion. A common solution is to add 3 drops of the oil into a glass of juice and drink this mixture daily for 3 to 5 days.

Colds and Sore Throats

Oil of Oregano is an excellent early defense mechanism when you feel a cold or sore throat coming on. Simply take 3 drops of the oil once per day (you can mix it into a glass of orange juice) and you should notice results within a few hours. Repeat this once per day for up to 5 days until the symptoms are gone. 


DIY Oil Of Oregano
You need a ratio of 1:1 with fresh Oregano and Olive Oil.
I used 1/2 cup of Oregano to 1/2 cup Oil, but you can reduce the amount of oil if you'd like a stronger batch.
  • Wash and dry your Oregano
  • Place Oregano in a ziplock bag, cover with a tea towel and hammer at the leaves using a meat tenderizer or something similar. This will bruise the leaves causing them to release their oils.
  • Heat up a small amount of Olive Oil (in the microwave is fine) until warm than add to ziplock baggy of crushed leaves. Close the bag and squish and smush the oil and leaves around for a minute or two. (This ensures that you pick up the released oil.)
  • Now pour the leaves and remaining Olive oil into a clean, dry glass container with a fitted lid, and place in a cool, dry place for 2 weeks.
  • After 2 weeks strain the leaves from the oil and bottle. 
Please keep in mind that there are side effects to taking Oregano oil continuously, and should be avoided if pregnant. 

Voila! You've just made your own Oil of Oregano!


Peace,
Photobucket

Friday, September 21, 2012

Homemade Vapour Rub


I came across this recipe for homemade vapour rub from CrunchyBetty's website.
As a Mum to a little one, I didn't feel comfortable even using the baby brand vapour rub on her little chest when she got the coughs or sniffles.
This recipe seemed straight forward enough and true enough I soon had a natural vapour rub that seemed identical in texture and smell.

Homemade Vapour Rub

  • 2 tsp beeswax (grated)
  • 1/4 cup EVOO
  • 35 drops peppermint essential oil
  • 15 drops eucalyptus essential oil
  • 15 drops rosemary essential oil
Melt the beeswax and olive oil together until smooth (I used a glass bowl in the microwave, stopping and stirring a couple of times until it was completely melted). Stir well with a whisk. Continue whisking while adding the essential oils drop by drop. Transfer to a small lidded container. Store in a cool, dry place for up to  a year (or more).

Both baby and hubs loved it, not to mention it left the skin on the bottom of my feet nice and soft!
Enjoy!

Peace,
Photobucket

Tuesday, August 21, 2012

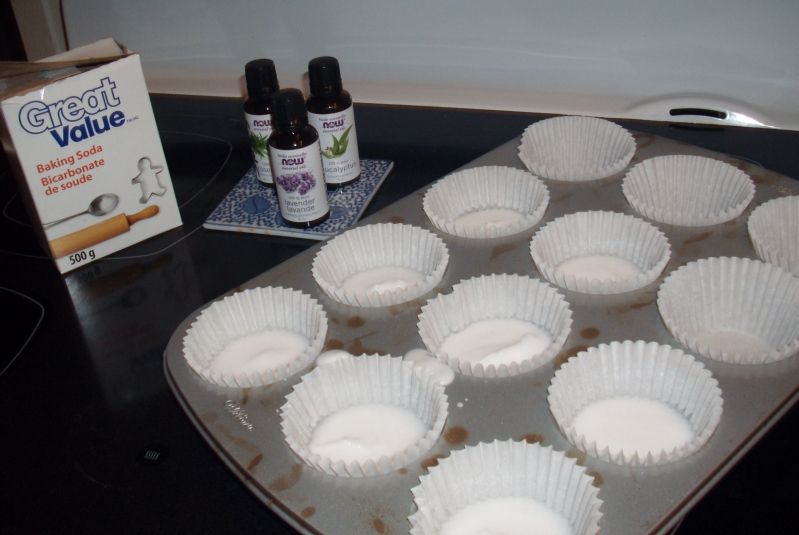
DIY Decongestant Shower Disks

DIY Decongestant Shower Disks


My whole household has been sick with a cold and I desperatly wanted something to help clear our poor sinus'.
Thakfully I came across THIS. A recipe for a vicks vapor rub shower disk knock-off.
The recipe is extremely easy:


  • Baking Soda
  • Water
  • Eucalyptus EO
  • Rosemary EO
  • Lavender EO
With 2 cups of baking soda I was able to make about 8 disks.
Add water to baking soda slowly, until it is thick and resembles putty, add 15 drops of each essential oil.
Spoon into lined muffin tray and let dry over-night OR bake at 350' for 20 minutes. 

I added a little too much water to mine, and they didn't set as well as I would've liked overnight - so I popped them into a 350 oven for about 15 minutes and they seem just right. 

To store keep in dry place, and are well kept in just a simple paper bag.
Try not to put disk under direct water-fall, instead put it on a shelf or side of the tub. The steam of your shower should draw out the EO's and you'll keep your disks longer. 

Enjoy!

Peace,

Photobucket

Sunday, March 25, 2012

Bar Shampoo Soap and the Oil Cleansing Method

In my quest to eat more natural and healthy foods, I've also desired using less processed products on my person.
You can absorb just as many chemicals by rubbing it on your skin, brushing you teeth or washing your hair, as you can by eating it.
I started researching other alternatives to store bought products and came across more natural beauty choices.
A strangely popular "no-poo" method for washing hair has gotten a fairly large following; women and men who have given up shampoo and conditioner all together, and have started using baking soda, and apple cider vinegar   as replacements.
I was tempted, but call me a wuss, I wanted to ease into tossing shampoo, especially since I have naturally greasy hair, and cannot go more than a day without washing.
So, I found an alternative:
This is the "Soap Works Shampoo and Conditioner" bar. The soap works is a Canadian based company, nothing they make contain phosphates or lauryl sulphates. 
I found it at my local organic store for a mere $1.45.
 I figured if I was game enough to be tempted by just baking soda alone, surely I could try this! I've been using it for a week now, as is Jeremie and we both quite like it. It smells lovely, has a nice lather and my hair feels clean and fluffy. If I had to knit-pick one thing, I would say my hair is slightly drier. However, being a naturally greasy person, this hasn't really been a problem. 
I've been able to go three days without washing my hair, and still not get to that frighteningly-stringy greasy look. 
During my little cruise for natural beauty products, I came across this: "The Oil Cleansing Method"
I know it sounds crazy, cleaning your face with oil?? But it seemed just crazy enough to work. 

"The basic concept of this skin care and cleansing method is that the oil used to massage your skin will dissolve the oil that has hardened with impurities and found itself stuck in your pores. The steam will open your pores, allowing the oil to be easily removed. Should you need it, the smallest drop of the same oil formula patted over damp skin will provide the necessary lubrication to keep your skin from over-compensating in oil production. "

Well, okay then. I'll give it a shot.  
I already had the Olive oil at home, and after a quick jaunt found my castor oil. The little bottle I conveniently found at the dollar store. You can apparently buy little bottles and the like in their "travel-sized" section. 
Because I think I have fairly normal skin, (sometimes dry, sometimes greasy) I used a 1 to 1 ratio of castor oil and olive oil. I made only 2 tsp castor / 2 tsp. olive, as I'm still in the 'testing' stage. 
" Castor Oil has potent anti-inflammatory properties, but is also healing and cleansing, which is why we're focusing on this oil as our primary oil."  
The olive oil is simply used as a carrier oil, and can be replaced by grape seed or sunflower seed oil. I just used what I had on hand. 

The rest was very simple. Throw it in a bottle and give it a shake!
The best time to cleanse is at night, to get the day's grime off, and this cleanser is also a wonderful makeup remover too! 
Take a quarter sized amount in your hands, rub them together to warm the oil. 
Massage into your face for approximately a minute making sure to work into your problem areas. 
Take a face cloth and soak in water warm enough to steam the oil off your face - lay it on your face for another minute. 
Your face should immediately feel softer. If you're using the right ratio of oils, you shouldn't need to moisturize. If your skin feels dry, add more olive oil to your mix, if your skin feels greasy, cut back on your olive oil amount or adjust the ratio to a greater amount of castor oil.

I've just started using this, so I will update you all in a week or so when I have some real results. However, after just a few uses, my skin already feels softer and more moisturized. 
I'll also try to take a picture of my hair after 3 days of no washing, and then again after using my soap. 

So that's what I've been doing lately! 


Peace,
Photobucket

LinkWithin

Related Posts Plugin for WordPress, Blogger...